


PD35RACBK-CL01BK
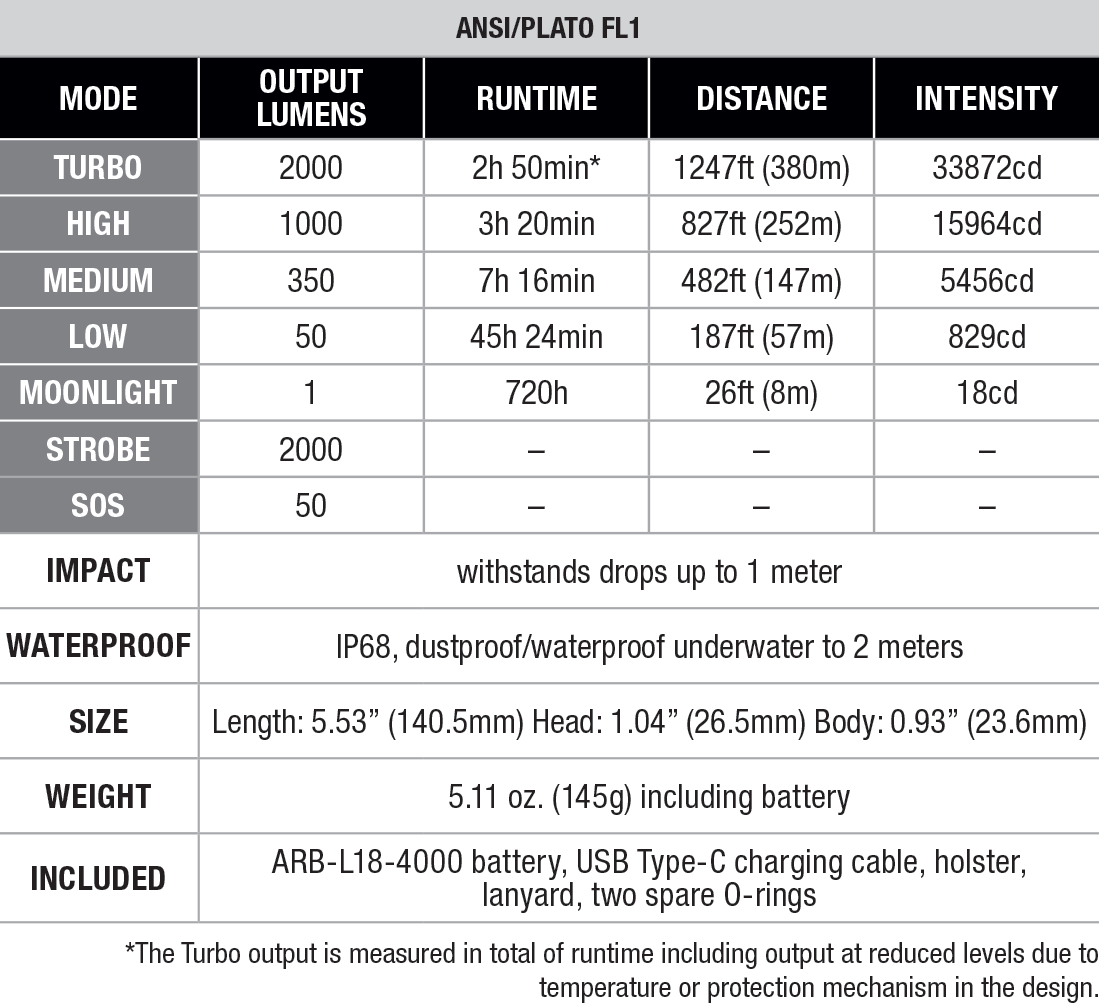
The Fenix PD35R ACE is a next-generation flashlight built for those who demand the ultimate control in any environment. As part of the Advanced Command Edition (ACE) Series, it’s engineered for optimum performance, with refined features that make operation faster, cleaner, and more intuitive. Delivering up to 2000 lumens and a 1247-foot (380-meter) beam, the PD35R ACE doesn’t just light up the dark, it cuts through it.
SET mode, a hidden switch tucked beneath the neck of the flashlight that puts configuration in your hands. Choose between three preset options so you’re in control of how you’d like to operate the flashlight. Once you lock in your preference, it’s all action—no distractions. You can even disable the Strobe mode if you so choose.
Built tough with a protected USB-C port, which adds to its IP68 rated dust and waterproof rating, and impact resistant to 1 meter, the PD35R ACE is the choice for law enforcement, outdoor missions, and everyday precision.
Operating Instructions
On/off
Tap the tactical switch to turn on the light momentarily, release it and the light will go out.
Fully press the tactical switch to constantly turn on the light, press it again the light will go out.
Output Selection
With the light turned on, single click the neck-mounted switch to cycle through Moonlight→Low→Med→High→Turbo.
SET mode adjustment
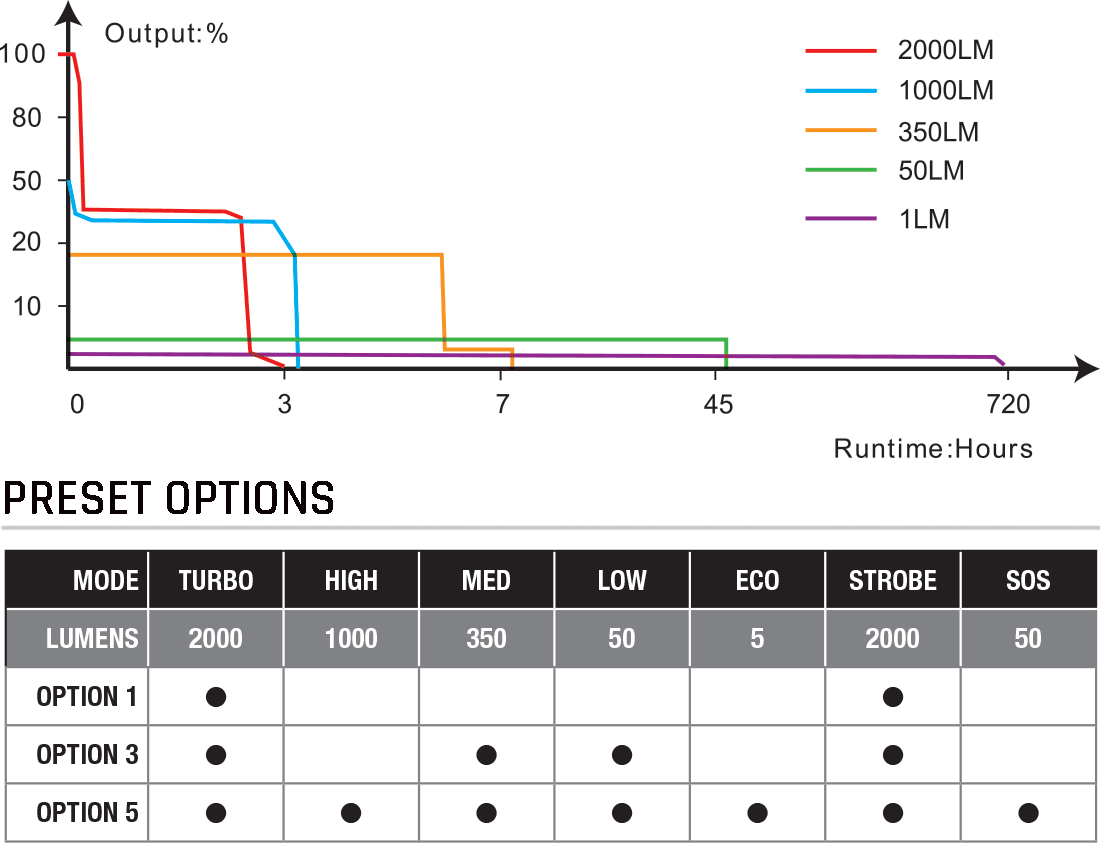
The SET mode is built-in with three lighting options, which can be selected based on different lighting demands.
Loosen the light neck to reveal the hidden SET switch.
With the light turned on, single click the SET switch to cycle through Option 1 (1 output)→Option 2 (3 outputs)→Option 3 (5 outputs). When users turn on the flashlight for the first time, Option 3 will be selected by default.
When a lighting option is selected, its corresponding indicator will display green for 3 seconds to confirm the selection. The corresponding numbers indicate the currently available output amounts for each option.
After the option selection is completed, single click the neck-mounted switch to select the needed output. The output settings of all three options are listed below:
|
Mode |
Moonlight |
Low |
Med |
High |
Turbo |
Strobe |
SOS |
|
|
Output |
1 lm |
50 lm |
350 lm |
1000 lm |
2000 lm |
2000 lm |
50 lm |
|
|
Option 1 |
|
|
|
|
√ |
On |
Off |
|
|
Option 3 |
|
√ |
√ |
|
√ |
|
||
|
Option 5 |
√ |
√ |
√ |
√ |
√ |
√ |
||
Note:
When utilizing two CR123A batteries, the flashlight's Turbo mode provides a brightness level of 1000 lumens, and the flashlight's Strobe mode also provides a brightness level of 1000 lumens.
The customizable Strobe mode can be turned on or off independently by users. It is turned on in all options by default.
3. The output amounts for each lighting option do not include Strobe and SOS.
SOS & Strobe Modes
With the light turned on, press and hold the neck-mounted switch for 0.5 seconds to enter the Strobe mode, single click it once again to switch to the SOS mode. Press and hold the neck-mounted switch again for 0.5 seconds to recall the previously used lighting option and brightness level.
With the light turned on, press and hold the SET switch for 1.2 seconds to turn on/off the Strobe mode in all options. The flashlight will blink twice to confirm the selection.
Note:
Only Option 5 features the SOS mode. After turning off the Strobe mode, press and hold the neck-mounted switch for 0.5 seconds to enter the SOS mode.
Intelligent Memory Circuit
The light automatically memorizes the last selected lighting option and brightness level excluding Strobe and SOS.
Battery Specifications
|
Type |
Dimensions |
Nominal voltage |
Usability |
|
|
Fenix ARB-L18 Series |
18650 |
3.6 V |
Recommended |
√√ |
|
Non-rechargeable Battery (Li-ion) |
CR123A |
3.0 V |
Usable(no charging) |
√ |
|
Rechargeable Battery (Li-ion) |
18650 |
3.6 V |
Caution* |
! |
|
Rechargeable Battery (Li-ion) |
16340 |
3.6 V |
Banned |
× |
|
Rechargeable Battery (LiFePO4) |
18650 |
3.2 V |
Banned |
× |
*18650 Li-ion batteries are powerful cells designed for commercial applications and must be treated with caution and handled with care. Using low-quality batteries or mishandling batteries (such as short-circuiting or overheating) could lead to combustion and jeopardize the safety of users and property. Any adverse effects resulting from the use of low-quality batteries are not covered by any Fenix warranty or liability. Using quality batteries with circuit protection will reduce the potential for combustion or explosion.
Battery Replacement
Unscrew the light tail and insert the battery with the anode side (+) towards the light head, then screw the light tail back on.
Charging
Loosen the light neck to reveal the USB Type-C charging port, then connect the USB Type-C end of the charging cable to the light.
The indicator will display red while charging and will turn green when fully charged.
Once charging is completed, be sure to unplug the charging cable and tighten the light neck to ensure normal use.
Note:
The normal charging time of the included Fenix ARB-L18-4000 battery is approximately 3 hours from depleted to fully charged with a 5 V/3 A charging adapter.
Recharge a stored light every four months to maintain the optimum performance of the battery.
Press and hold the neck-mounted switch for 0.5 seconds to turn on/off the light while charging. During charging, the tail switch will not respond to any operation.
After turning off the light with the neck-mounted switch, if the tail switch is in fully pressed state while unplugging the charging cable, the light will light up automatically and recall the previously used brightness level.
Battery Level Indication
Each time the light is turned on, the indicator will show the current battery level and will last for 3 seconds.
Green light on: saturated 100% - 85%
Green light flashes: sufficient 85% - 50%
Red light on: poor 50% - 25%
Red light flashes: critical 25% - 1%
*Note: This feature only works with a Fenix ARB-L18 Series battery.
Intelligent Overheat Protection
The light will accumulate a lot of heat when used at high output levels for extended periods. When the light reaches a temperature of 60°C/140°F or above, it will automatically step down a few lumens to reduce the temperature. When the temperature drops below 60°C/140°F, the light will gradually recall the preset output level.
Low-voltage Warning
When the voltage level drops below the preset level, the light is programmed to downshift to a lower brightness level until Eco output is reached. When this happens in Eco output, the battery level indicator blinks red to remind users to replace or recharge the battery in a timely manner.
*Note: This feature only works with a Fenix ARB-L18 Series battery.
Usage and Maintenance
Disassembling the sealed head can cause damage to the light and will void the warranty.
Fenix recommends using an excellent quality battery.
If the light will not be used for an extended period, remove the battery, or the light could be damaged by electrolyte leakage.
Unscrew the light tail a few turns or remove the battery to prevent accidental activation when the light is placed in a closed and flammable environment such as pockets and backpacks!
Long-term use can result in O-ring wear. To maintain a proper water seal, replace the O-ring with an approved spare.
Periodic cleaning of the battery contacts improves the light's performance as dirty contacts may cause the light to flicker, shine intermittently or even fail to illuminate for the following reasons:
A: Poor battery level.
Solution: Replace or recharge the battery (Ensure the battery is inserted according to the manufacturer’s specifications).
B: The contact or contact point of the battery or flashlight is dirty.
Solution: Clean the contact points with a cotton swab soaked in rubbing alcohol.
If the above methods don't work, please contact your authorized distributor.
Warning
Do NOT place this light in the reach of children!
Do NOT shine the light directly into the eyes of anyone!
Do NOT place light head near flammable objects, high temperatures can cause objects to overheat and become flammable/ignite!
Do NOT use the light in inappropriate ways such as holding the unit in your mouth, doing so could cause serious personal injury or death if the flashlight or internal battery fails!
This light will accumulate a significant amount of heat while operating, resulting in a high temperature of the flashlight shell. Pay close attention to avoid burns.
Unscrew the light tail a few turns or take out the battery to prevent accidental activation during storage or transportation.
The LED of this light is not replaceable; so the whole light will need to be replaced when the LED reaches the end of its lifespan.
What does the acronym ACE represent? What are the key features of PD35R ACE?
A: The “ACE” stands for Advanced Command Edition. The flashlight's key features include:
What kind of LED is used in PD35R ACE? Does Fenix offer to replace LED?
A: A Luminus SFT40 LED with a lifespan of 50,000 hours.
Fenix does not provide LED replacement services for the time being, and users are not recommended to replace the LEDs independently, which may affect product performance and cause product damage.
What is the color temperature of PD35R ACE?
A: Around 6500K.
What is the working voltage of PD35R ACE?
A: The working voltage is 2.8 V - 6.0 V.
Is PD35R ACE rechargeable? How long is the charging time?
A: Yes, PD35R ACE is rechargeable with a hidden USB Type-C port. The indicator will display red while charging and will turn green when fully charged. The normal charging time of the included battery is about 3 hours from depleted to fully charged.
Why does the PD35R ACE downshift to a lower mode after being used for a while and the higher mode cannot be selected?
A: There are two reasons:
Why does the PD35R ACE happen to flicker?
A: The reasons that may cause the light to flicker, shine intermittently or even fail to illuminate:
What are the optional accessories for PD35R ACE?
A: The PD35R ACE flashlight package comes with a lanyard and a holster. Other compatible accessories include:
AER-02 V2.0 Remote pressure switch
ALG-00 Flashlight ring
ALG-15 Rail mount
ALG-16 Rail mount
AOT-S+ Traffic wand
AOF-S+ V2.0 Filter adapter
AOD-S V2.0 Diffuser tip
How to operate the SET mode of PD35R ACE?
A: The SET mode features 3 lighting options, which can be selected based on various application scenarios and users’ usage habits. The operations are as follows:
What should I do if the PD35R ACE needs repair?
A:


